
Supporting Students with
Disabilities in Online Course
LONG BEACH CITY COLLEGE
Disabled Students Programs & Services (DSP&S)
PAGE 1
Contents
Creating an Accessible Canvas Site ............................................................................................ 3
Creating documents ................................................................................................................ 3
Canvas Features Use the Rich Content Editor ................................................................... 3
View Rich Content Editor ................................................................................................... 3
Documents in Other Formats (Word, PDF, PowerPoint) ............................................... 4
Creating Accessible Documents in Microsoft Word .................................................... 4
Use Headings ............................................................................................................... 4
Use Lists ........................................................................................................................ 5
Use Meaningful Hyperlinks ......................................................................................... 5
Add Alternate Text for Images ................................................................................... 6
Identify Document Language ..................................................................................... 6
Creating Accessible PDFs Using Word and Adobe Acrobat Pro ................................. 6
Word 2010, 2013, and 2016 (Windows) ....................................................................... 7
Word 2016 (Mac) .......................................................................................................... 7
Fixing Inaccessible PDFs Using Adobe Acrobat Pro DC .............................................. 8
Creating Accessible Presentations in Microsoft PowerPoint ....................................... 8
Use Built-in Slide Templates ...................................................................................... 8
Use Unique Slide Titles............................................................................................... 9
Make Hyperlinks and Tables Accessible ................................................................... 9
Set Reading Order of Slide Contents ......................................................................... 9
Add Alt Text to Visuals, and Tables .......................................................................... 10
Use the Accessibility Checker ................................................................................... 10
Export to PDF .............................................................................................................. 11
Creating Accessible Videos .................................................................................................... 11
Captions ............................................................................................................................... 11
Do it yourself ................................................................................................................... 11
Outsource ........................................................................................................................ 11
YouTube and Captions .................................................................................................. 12
Providing Students with Extra Time on Exams ....................................................................... 12
PAGE 2
On Canvas .............................................................................................................................. 12
Open Quizzes ................................................................................................................. 12
Moderate This Quiz ....................................................................................................... 13
View Search Filter .......................................................................................................... 13
View Moderate Quiz Columns ...................................................................................... 14
PAGE 3
Creating an Accessible Canvas Site
With Long Beach City College (LBCC) taking precautionary measures and moving
instruction to online platforms, it has become pertinent to ensure that course content
provided via online instruction are accessible on an IT level. This includes documents,
videos, and websites. Ensuring accessibility will ensure all students with and without
disabilities to participate fully in the course.
The following sections provide additional guidance for making online course materials
accessible.
CREATING DOCUMENTS
Some digital documents are more accessible than others. The most accessible document
format is HTML created using the rich text editor in Canvas.
Care must be taken to ensure web pages are accessible. For example, headings must be
tagged as headings at appropriate levels to form an outline of the document content, and
images must be briefly described for non-visual users by entering “alt text” in the
relevant form field when adding the image.
Canvas Features Use the Rich Content Editor
− Announcements
− Assignments
− Discussions
− Pages
− Quizzes
− Syllabus
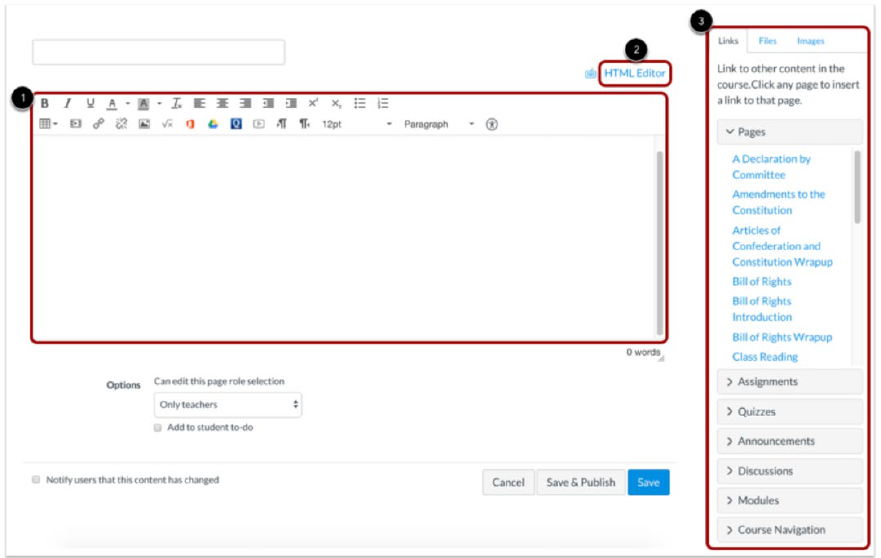
View Rich Content Editor
The Rich Content Editor includes the content area and the content selector.
Anything that can be viewed in a web browser can be inserted into the Rich Content
Editor content area [labeled 1 below].
Content can also input HTML directly into Canvas using the HTML Editor link [labeled
2 below].
Users can also easily link to course content using the Content Selector [labeled 3 below],
which is displayed in the sidebar any time the Rich Content Editor is open. Depending on
PAGE 4
the feature area being viewed (course or group), users may be able to link to existing
files, images, or links, and upload new files and images.
Documents in Other Formats (Word, PDF, PowerPoint)
If you choose to distribute documents in another format such as Adobe PDF, Microsoft
Word or Microsoft PowerPoint, know that these formats support accessibility, but
documents are not accessible by default. Authors must take care to follow the guidelines
for creating accessible documents. Many of the issues are the same as for web pages
(e.g., use appropriate headings, add alt text to images) but the techniques vary across
document authoring tools.
Creating Accessible Documents in Microsoft Word
The text within Word documents can be read by assistive technologies such as screen
readers and Braille devices. However, in order for Word documents to be fully
accessible, authors must follow the core principles below:
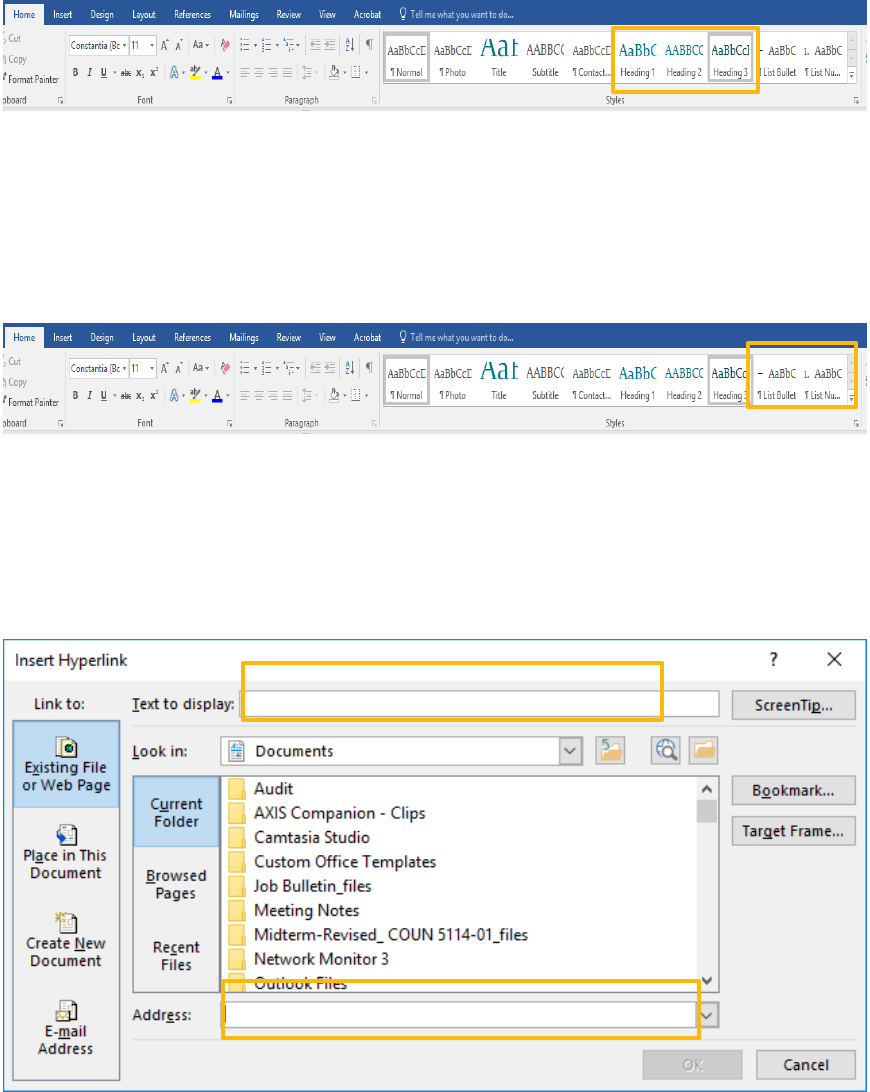
Use Headings
Headings and subheadings should to be identified as such using the built-in heading
features of the authoring tool. Headings should form an outline of the page content
(Heading 1 for the main heading, Heading 2 for the first level of sub-headings, Heading 3
PAGE 5
for the next level of sub-headings, etc.). This enables screen reader users to understand
how the page is organized, and to quickly navigate to content of interest. Most screen
readers have features that enable users to jump quickly between headings with a single
key-stroke.
Use Lists
Any content that is organized as a list should be created using the list controls. When lists
are explicitly created as lists, this helps screen readers to understand how the content is
organized. When screen reader users enter a list, their screen reader informs them that
they’re on a list and may also inform them of how many items are in the list, which can
be very helpful information when deciding whether to continue reading.
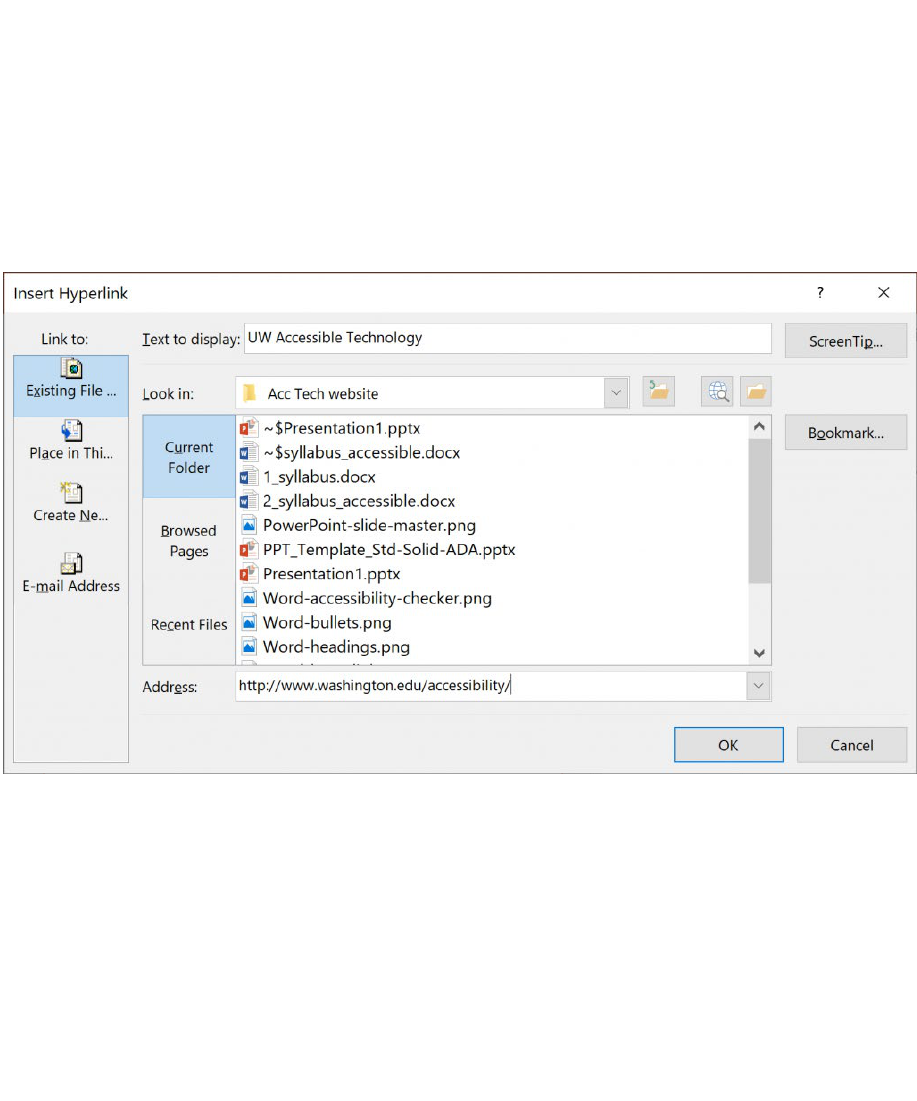
Use Meaningful Hyperlinks
Links presented in an electronic document should convey clear and accurate information
about the destination. Most authoring tools allow the creator to assign a hyperlink to text.
For documents that will be circulated as print material, use a URL shortening service to
create a customized and meaningful link name.
Clear and accurate information
Actual Hyperlink
PAGE 6
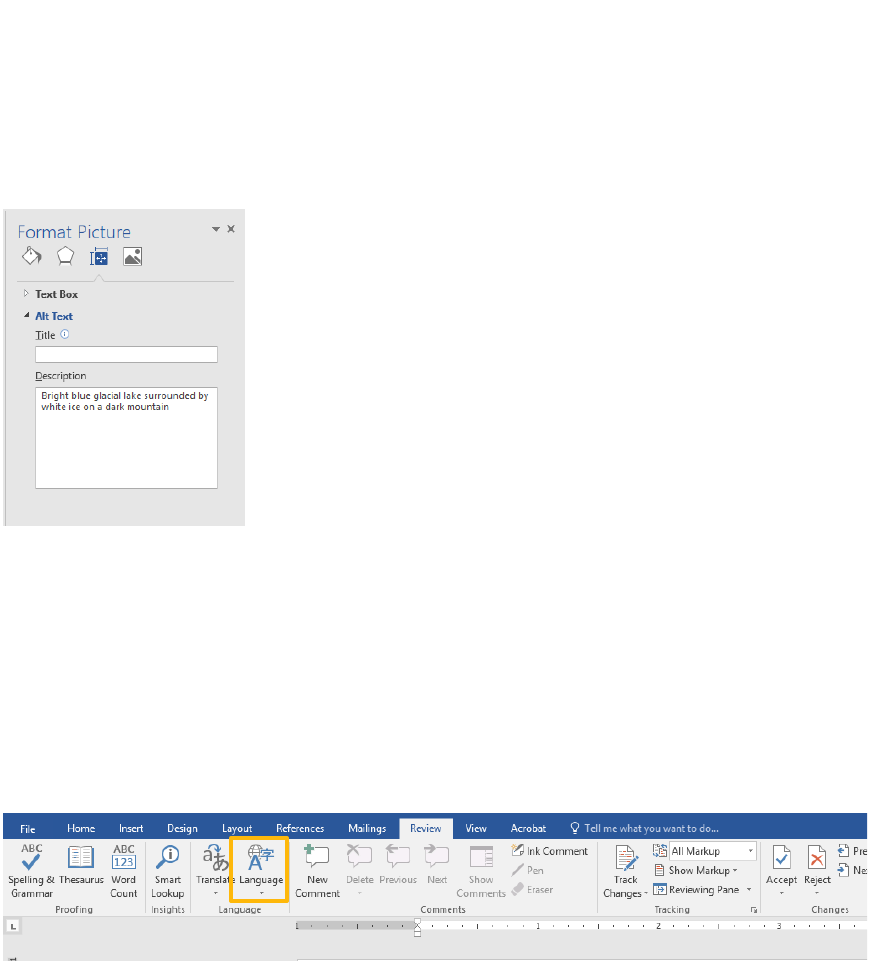
Add Alternate Text for Images
Users who are unable to see images depend on content authors to supplement their
images with alternate text, which is often abbreviated “alt text”. The purpose of alt text is
to communicate the content of an image to individuals who can’t view it.
If images are purely decorative and contain no informative content, they do not require a
description. However, they may still require specific markup so screen readers know to
skip them.
Identify Document Language
Leading screen reader software is multilingual, and can read content in English, Spanish,
French, and a wide variety of other languages. In order to ensure that screen readers will
read a document using the appropriate language profile, the language of the document
must be identified.
You should also identify the language of any content written in a language other than the
document’s default language. With this information, supporting screen readers will
switch between language profiles as needed on the fly.
Creating Accessible PDFs Using Word and Adobe Acrobat Pro
The first step in creating an accessible PDF from Microsoft Word is to ensure that the
original Word document is accessible.
Starting with an accessible Word document, a goal when exporting to PDF is do so in a
way that preserves the accessibility features of the Word document, including heading
structure, alternate text for images, and markup that explicitly identifies lists, tables,
document language, and other content that is important for accessibility.
PAGE 7
Do not print to PDF. This method of creating a PDF does not preserve the document’s
accessibility features. The correct method of exporting to PDF depends on which version
of Microsoft Office you’re using.
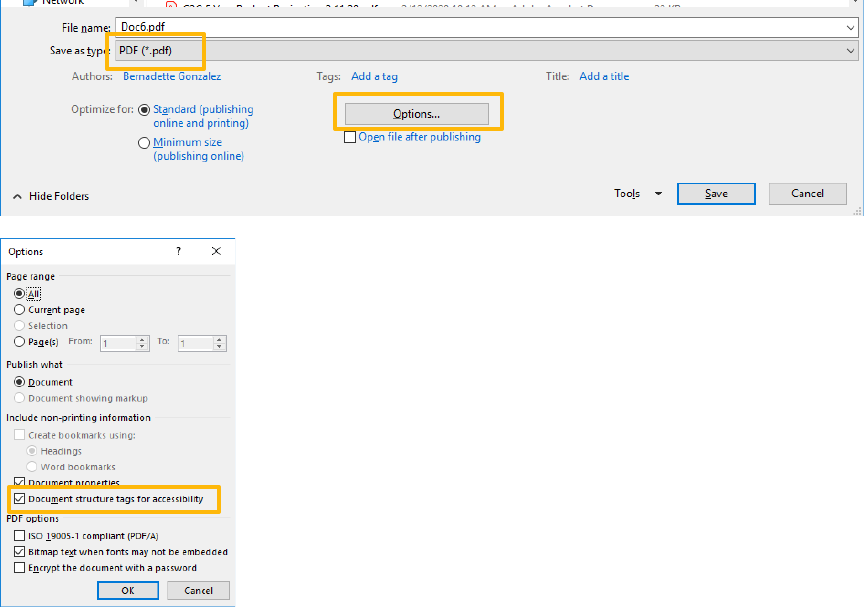
Word 2010, 2013, and 2016 (Windows)
Go to File > “Save As…” and select PDF from the choices provided. By default this
produces a PDF that preserves the document’s accessibility features.
When saving, select Options and be sure that “Document structure tags for accessibility”
is checked. This is checked by default, but could become unchecked under certain
circumstances.
Word 2016 (Mac)
In Office 2016, Word can now generate a tagged PDF that preserves a document’s
accessibility features. To use this feature:
Go to File > “Save As…” and select PDF from the choices provided. By default this
produces a PDF that preserves the document’s accessibility features.
When saving, be sure the box labeled “Best for electronic distribution and accessibility”
is checked.

PAGE 8
Fixing Inaccessible PDFs Using Adobe Acrobat Pro DC
It is always best if possible to start with an accessible source document (e.g., in Microsoft
Word) and export to an accessible PDF. This way, if the document is edited later, the
document’s accessibility features will still be intact and when the document is exported
again to PDF the accessibility features will again be passed to the PDF.
However, if the original source document is not available, accessibility features can be
added to the PDF using Adobe Acrobat Pro DC.
For steps on this process please visit the following link: Fixing PDF Accessibility
Creating Accessible Presentations in Microsoft PowerPoint
Microsoft PowerPoint is commonly used to create slide show presentations to convey
information in a visual format that can include a combination of text, tables, images,
charts, and graphics. For users of assistive technology, screen readers and Braille devices
can convey content in a PowerPoint presentation if the author follows the core principles
outlined above. The following information includes basic steps for applying these core
accessibility principles and for keeping accessibility in mind.
Use Built-in Slide Templates
Built-in slide layout templates are designed so the reading order is compatible with
assistive technology such as screen readers.
Avoid using Text Boxes as they do not show up in Outline View which makes
converting PowerPoint to HTML problematic. If there are more than one Text Box
on a slide it may be read out of order by a screen reader. Use a pre-set layout from
the New Slide drop-down selection options, select the layout that best fits your needs.
PAGE 9
Use Unique Slide Titles
Individuals who use a screen reader skim slide titles to navigate, they can quickly scan
through a list of slide titles and go right to the slide they want. Using unique slide titles
allows them to clearly understand which slide they are on. Avoid using the same title for
slides that have spill-over information, consider including additional information such as
‘Slide Title 1 of 2’.
Make Hyperlinks and Tables Accessible
Screen reader users sometimes scan a list of links. Links should provide a clear and
accurate description of the link destination. Rather than providing the URL of the link,
consider creating a hyperlink with text to describe it.
To keep track of their location in a table, screen readers count table cells and use header
information to identify rows and columns. If a table is overly complex, the screen reader
loses count and can’t provide useful information about the table. Blank cells in a table
could also mislead someone using a screen reader into thinking that there is nothing more
in the table.
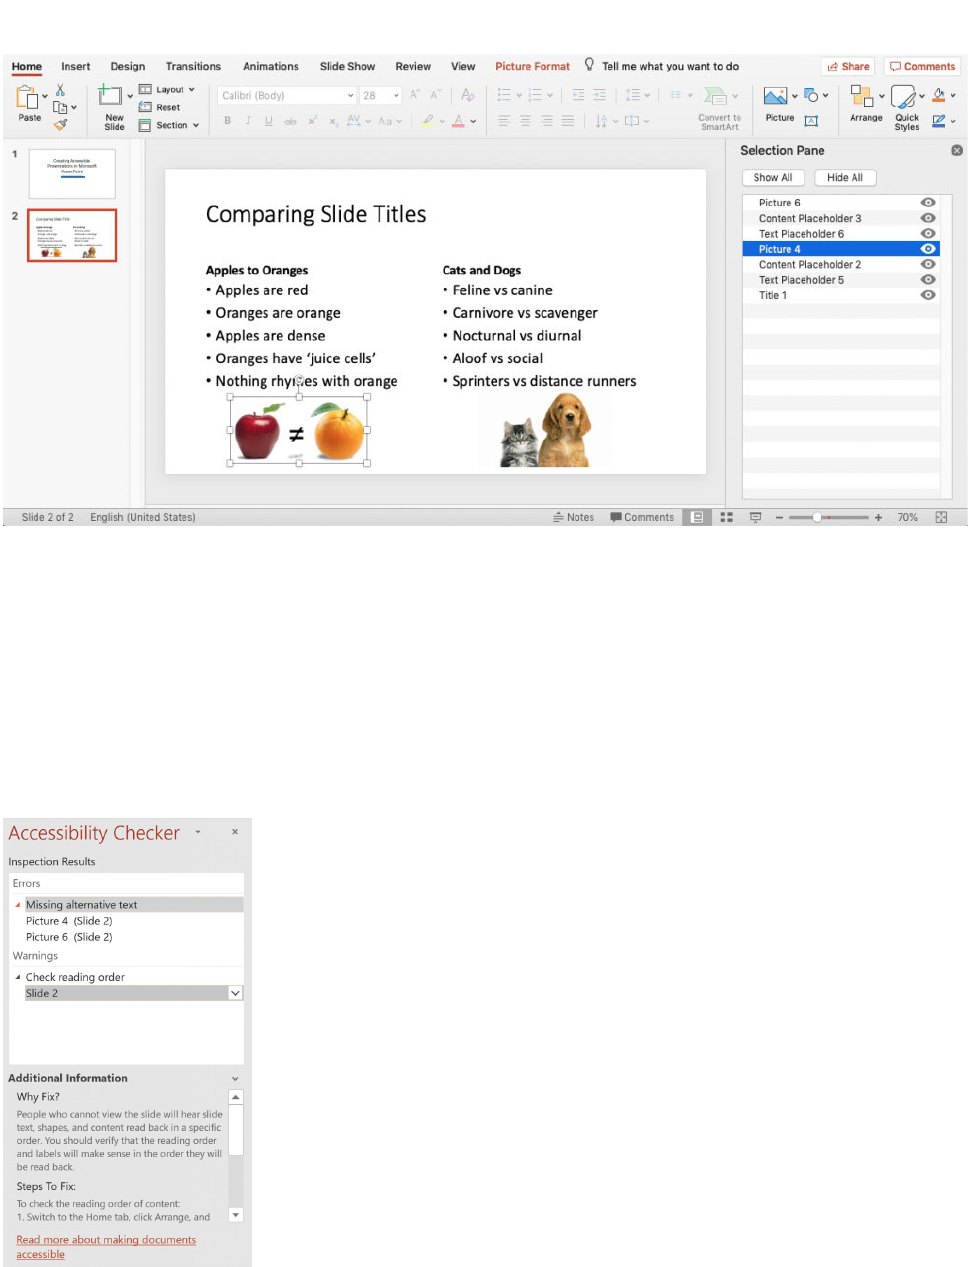
Set Reading Order of Slide Contents
Screen readers read the elements of a slide in the order they were added to the slide,
which might be very different from the order in which things appear. To make sure
everyone reads the contents in the order you intend, it’s important to check the reading
order by using the Selection Pane. From here, you can drag and drop to adjust the reading
order of the contents on the slide.
PAGE 10
NOTE: The reading order in the Selection Pane should be arranged from the bottom up.
The title should be at the very bottom with subsequent content following it.
Add Alt Text to Visuals, and Tables
For screen reader users, alternative text helps to communicate what is important in
images and other visuals. Alt text provides a textual alternative to non-text content.
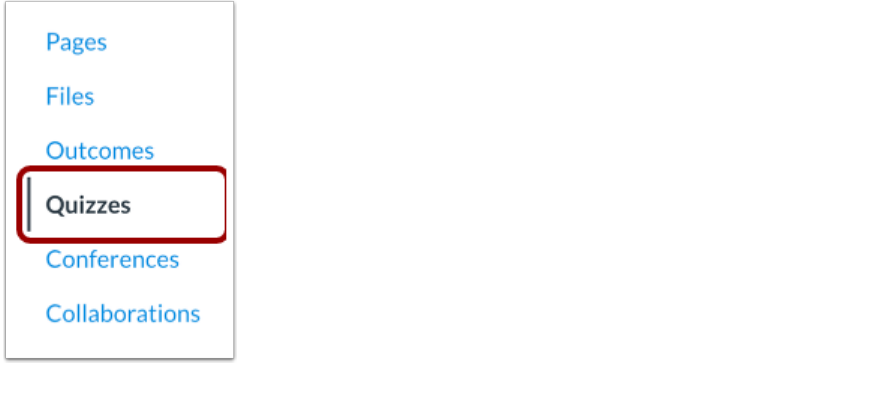
Use the Accessibility Checker
Microsoft products have a built-in accessibility checker which can help the document
author test the overall accessibility of the document. The checker provides Inspection
Results, feedback about the importance of each item, and tips on how to repair issues.

PAGE 11
Export to PDF
If all of the steps were followed to create an accessible PowerPoint presentation,
exporting to PDF properly will ensure heading structure and other accessibility
information will remain intact.
Users of PowerPoint for Mac should be cautioned that exporting to PDF will not yield an
accessible, tagged PDF document, it must be remediated using Acrobat Pro.
CREATING ACCESSIBLE VIDEOS
Videos should be produced and delivered in ways that ensure that all members of the
audience can access their content. An accessible video includes captions, a transcript, and
audio description and is delivered in an accessible media player.
Captions
Captions are text versions of the audio content, synchronized with the video. Captions are
mandated by law and essential for ensuring your video is accessible to all students.
There are two general approaches to captioning video:
Do it yourself.
There are free tools available online that make it possible and easy to caption your own
video. The following are platforms that provide some type of free captioning:
− Camtasia: LBCC currently has a campus wide license
− Amara.org
− Dotsub.com
− Subtitle-horse.com
Outsource.
− If you use Canvas:
1. Submit video through 3CMedia upload space in Canvas
2. Captioning will automatically be added to your media. Closed captioning will be
completed in approximately 3-5 business days. In canvas
− If you do NOT use Canvas
1. Check with your department for approval to submit a captioning request form. Please
get departmental approval before submitting.
2. Submit a Captioning Request Form at https://lbcc.instructure.com/courses/26987
PAGE 12
3. After submitting the Caption Request Form, based on the information provided, your
request is either routed to DSP&S or the Online Learning Depa1tment for review &
follow-up.
4. Either DSP&S or the Online Learning Department will send the video to a vendor for
captioning, and will return the captioned video along with an invoice of cost to you
and your department.
YouTube and Captions
Please be aware that YouTube captions are not always accurate and should not be
considered reliable. YouTube utilizes voice recognition and as a result, the captions are
often inaccurate and do not possess the proper punctuation necessary for full student
access.
Providing Students with Extra Time on Exams
ON CANVAS
Once you have published a quiz, the quiz sidebar shows the Moderate Quiz link, which
allows you to moderate the quiz for each student in your course. On the Moderate Quiz
page you can view the progress of student submissions and view the number of quiz
attempts each has taken. You can also grant students extra attempts, grant extra time for
timed quizzes, and manually unlock quiz attempts.
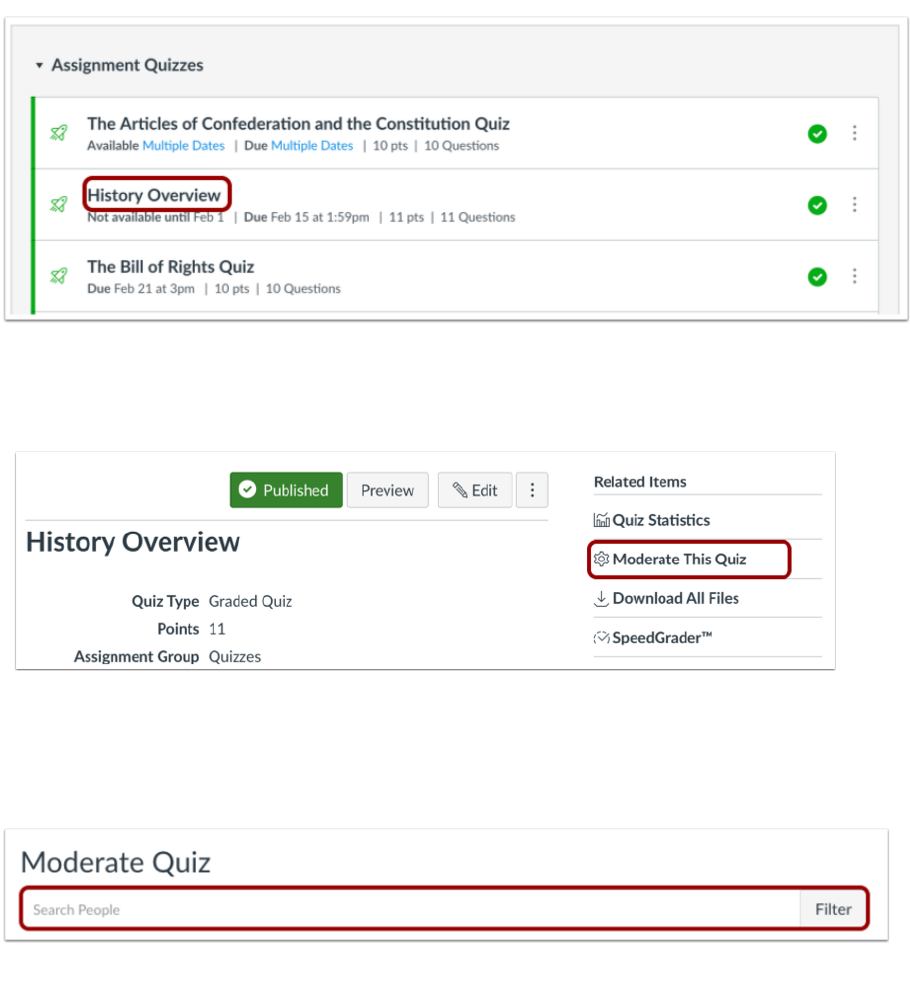
Open Quizzes
In Course Navigation, click the Quizzes link.
PAGE 14
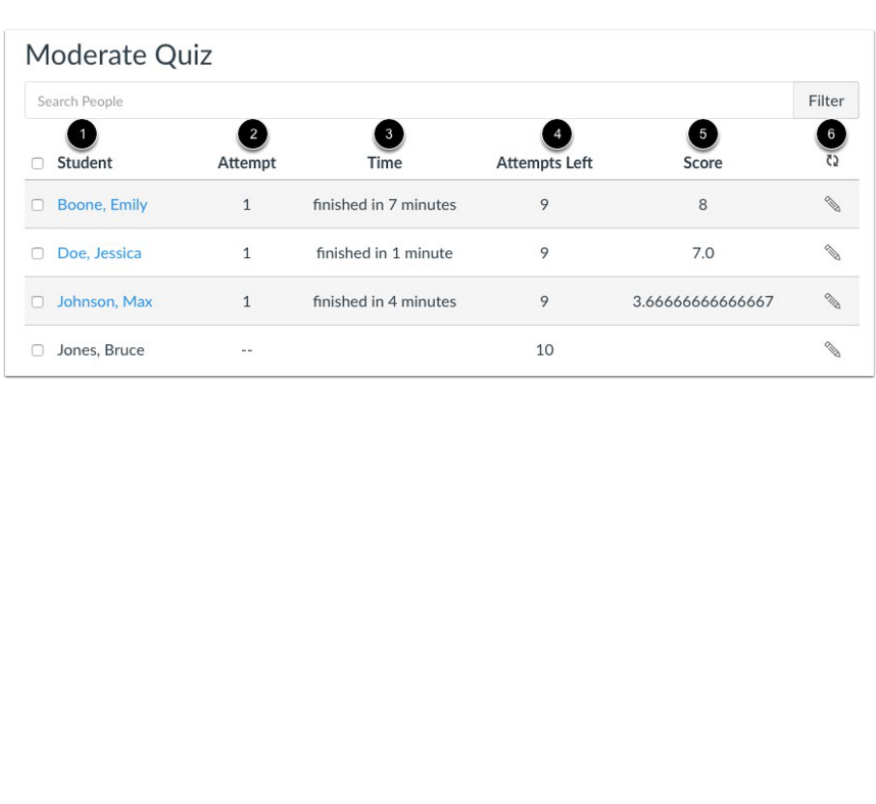
View Moderate Quiz Columns
The Moderate Quiz page displays the following information:
− Student name [1]
− Number of times the student has already attempted to take this quiz [2]
− Quiz time—completed attempts show the time it took for the student to complete
the quiz; running time shows the remaining time the student has to complete the
quiz [3]
− Number of remaining attempts, if any [4]
− Quiz score—for multiple submissions, the score is the most recent attempt [5]
